Formula Mazda Gearbox Basics
The Formula Mazda (FM) drivetrain, which for our purposes is the gearbox plus the transaxle, was typically built with a mixture of components from Hewland Engineering and/or Webster Gears Inc. Regardless of the component origins, these FM drivetrains are often referred to as Hewland or Webster Mark 8/9 series units and most folks call ’em Mark 9’s. The Mark 9 was used in Formula Ford (FF), Formula Mazda, and various other race car platforms.
The following content describes how to inspect or change gears in the Hewland MK9 gearbox on a Standard Formula Mazda (FM). If you have a non-FM car with a Mk-9 you need to take note that the transaxle is installed in the FM so that its drain plug is on the bottom (you know… as it should be… not upside down), whereas other cars may have the transaxle installed with drain plug on the top. I could obviously make some jokes about the usefulness of drain plugs on the top of a gearbox, but I won’t. Anyway… depending on what car you have, ‘top’ in this document may be ‘bottom’ for your car, and ‘right’ might be ‘left’ on your car. Your call; you decide 🙂
The diagrams below show the layshaft on the bottom and the pinion shaft on the top. Note that when the FM transaxle and gearbox are installed in the Formula Mazda, the drain plug is on the bottom, the pinion shaft is on the bottom, and the layshaft is positioned on top.
Definitions
– Gearbox: Includes the rear cover, bearing carrier, selector finger, layshaft, selector forks, selector rails and… the gears. You know… it’s a box… and it has gears and sundry stuff in it.
– Transaxle: The big case that houses the differential, the ring and pinion (crown) gear and the pinion shaft. The main axles and CV Joints are bolted to the transaxle and the gearbox is bolted to the transaxle.
– Wife: This one is relatively easy because most folks know the definition already. I have a lovely wife that is kind enough to tolerate me and my race car. I use the word ‘wife’ a few times in this procedure but you should feel free to use ‘spouse’, ‘husband’, ‘girlfriend’, ‘boyfriend’, ‘significant other’, or whatever 🙂
The Hewland Mark 9
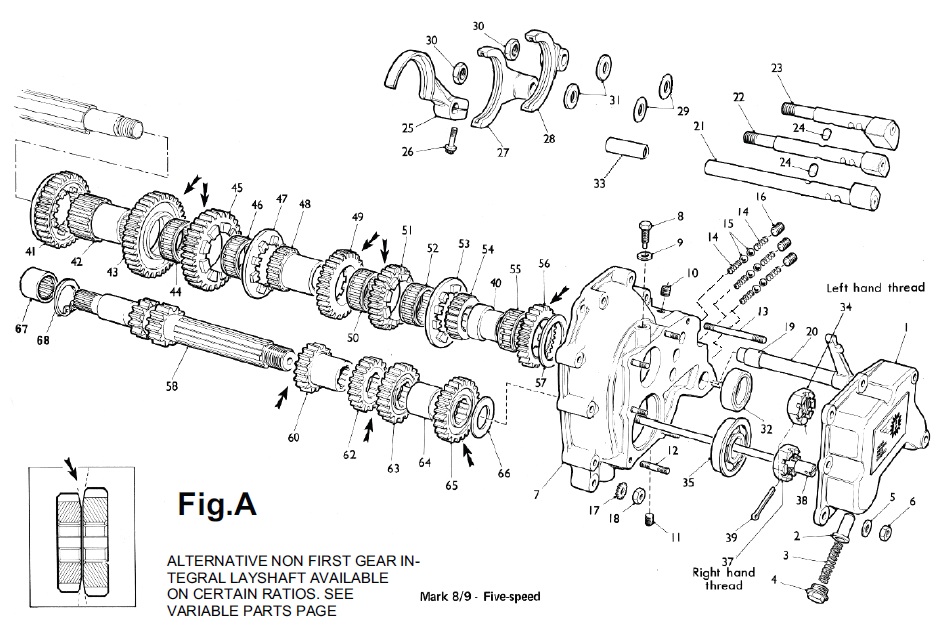
The diagram below shows a general purpose Hewland Mark 8/9 gearbox. It is included for reference; however, I’ve never seen this particular layshaft configuration in an Formula Mazda (FM). Also, ignore item ‘1’ (the rear gearbox cover) in the drawing; the FM uses a different rear cover. In this diagram the pinion shaft is on top and the layshaft is on the bottom.

*** Right-click here to open full-size image in a new tab or window ***
The FM Hewland/Webster Mark 9 Gearbox
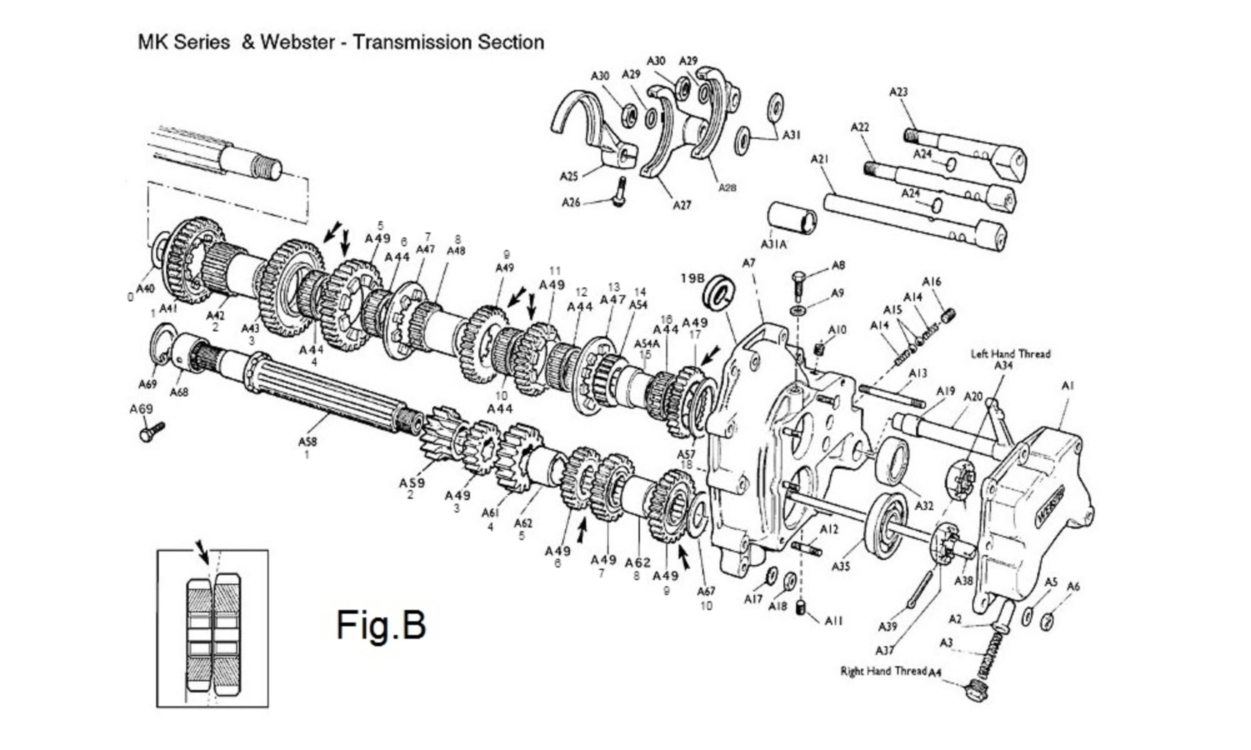
The following diagram gets closer to an actual Mk 8/9 FM gearbox. The rear gearbox cover on an FM is different than that pictured below; however, the configuration of the internals (gears, dog rings, bearings, etc.) on the layshaft is exactly what I have in my car. In this diagram the pinion shaft is on top and the layshaft is on the bottom. Again… note that when the FM transaxle and gearbox are installed in the Formula Mazda, the drain plug is on the bottom, the pinion shaft is on the bottom, and the layshaft is positioned on top.

*** Right-click here to open full-size image in a new tab or window ***
The FM Gearbox Case
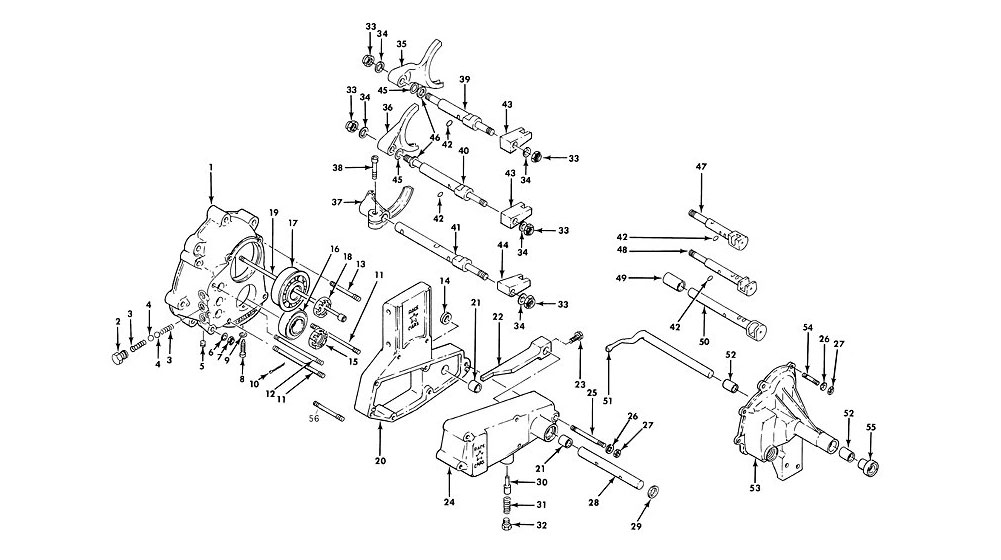
So here ya go… I’ve been telling you that the Mk 9 rear cover in the diagrams above wasn’t quite right and now you get to see the real FM gearbox case assembly. Working from the front of the car toward the back you can see the FM bearing carrier (part #1, the inner rear cover (part #20), and the outer rear cover (part #24). Just to make things confusing a few VW parts are included in the diagram that the FM doesn’t utilize; like the VW nose cone (part #53) and various adjacent components.

*** Right-click here to open full-size image in a new tab or window ***
Preliminary Stuff
Go to the Hewland website (www.hewland.com) and download the MK9 manual, or go to the Taylor Race Engineering (TRE) site to download the various gearbox references they provide. TRE blueprinted my gearbox and modified the shift finger mechanism to make shifting smoother. They do nice work… thanks Scotty and Dan 🙂
If you can’t find the gearbox references then maybe too much time has gone by and you’re reading ancient history. Or maybe the world has ended or something similar to that. Anyway… the manual has great pictures of the gearbox components and the orientation of each gear. Also, it has names and part numbers so you can actually learn what each component is called instead of throwing around phrases like “you know, that thing that slides into the curved brass gizmo”. It just makes us look foolish when we do things like that, so it’s good to know the names of the stuff we’re working with. Additionally, it can be used to impress onlookers so you’ll hear them say neat things like… “Wow… what did he just say?” and “Wow… what’s that smell… is that him or the car?” The references I mentioned are really valuable, and for some folks it’s all they’ll need as a reference when changing gears.
Draining the Gearbox
If you run a spec FM your gearbox drain plug should be safety wired. Cut the wire and use a 17mm hex to remove the drain plug. Take a good whiff of the gearbox fluid. It smells great. Don’t be afraid to go in the house and let your wife get a whiff of it too. It’s that good. Lastly, because you should feel obligated to share the joy of gearbox maintenance with others, be sure to leave some gearbox fluid on the doorknobs in the house. It’s easy to remove with Acetone if you must, and then you can then ask your wife which odor she liked best. That’s a win-win for everybody! Awesome!
Step-by-step Gearbox Maintenance Pictures:
Select an image to enlarge it, and then…
Use your mouse or keyboard arrow keys to move forward and backward as a slide show…


What oil do you use?
I use Red Line Lightweight ShockProof Synthetic Gear Oil in the gearbox/transaxle.
Film thickness greater than an SAE 75W140 and low fluid friction like 80W gear oil. Works great in Hewland MK9 gearboxes.